| Inspection And
Adjustment |
Procedure
Of ATF Level Confirming
| 1. |
Remove the filler plug (A) and the O-ring by
using Torx wrench(T55) then add 400cc of ATF from the oil filling
hole.
|
In case, remove the air cleaner
assembly. |

|
| 3. |
Shift from "P" to "D", then from "D" to "P",
keeping each shift position "N","R" more than 2 seconds with foot
braking. |
| 4. |
Repeat 2 times above procedure
"3". |
| 5. |
Remove the overflow plug(A) and the O-ring
by using Torx wrench(T40) when ATF temperature on CAN signal rises
up to 50~60°C at stabilized idle speed condition.

|
| 6. |
Oil level is correct if ATF drain volume is
in the range in the figure below.

|
| 7. |
If the thin oil stream becomes drop by drop,
fix the overflow plug with a new O-ring.
O-ring
size: inner dia.-6.07mm,
thickness-1.78mm
| |
| 8. |
Tighten the overflow plug by using Torx(T40)
wrench with the specified torque.
Tightening
torque :
6-9 Nm(0.6-0.9 kgf.m, 4.3-6.5
lb-ft)
| |
| 9. |
Fix the filler plug with a new
O-ring.
O-ring
size:
inner dia.-15.41mm,
thickness-2.21mm
| |
| 10. |
Tighten the filler plug by using Torx(T55)
wrench with the specified torque.
Tightening
torque :
24-56 Nm(2.4-5.6 kgf.m, 17.4-40.5
lb-ft)
| |
Procedure
Of ATF Level Adjusting
| 1. |
Park the vehicle on a flat road and lock the
tires. |
| 2. |
Shift the shift lever to the "P"
range. |
| 3. |
Remove the overflow plug (A) and the O-ring
by using a torx wrench (T40).
|
| 4. |
Remove the filler plug (A) and the O-ring by
using a torx wrench (T55).
|
In case, remove the air cleaner
assembly. |
|
| 5. |
Check if ATF drops from the overflow hole.
If ATF does not drop, add ATF until it
drops. |
| 6. |
Fix the overflow plug with the used O-ring
by using Torx wrench (T40). |
| 7. |
Add 600cc of ATF from the oil filling
hole. |
| 8. |
Coat the new O-ring with ATF, and install it
to the filler plug.
O-ring
size:
inner dia.-15.41mm,
thickness-2.21mm
| |
| 9. |
Tighten the filler plug by using Torx(T55)
wrench with the specified torque.
Tightening
torque :
24-56 Nm(2.4-5.6 kgf.m, 17.4-40.5
lb-ft)
| |
| 11. |
Raise ATF temperature on CAN signal up to
50~60°C at stabilized idle speed
condition. |
| 12. |
Shift from "P" to "D", then from "D" to "P",
keeping each shift position "N","R" more than 2 seconds with foot
braking. |
| 13. |
Repeat 2 times above procedure
"3". |
| 14. |
Remove the overflow plug and the O-ring by
using Torx wrench (T40). |
| 15. |
Check If the thin oil stream becomes drop by
drop when ATF temperatirue on CAN signal is at
50~60°C. |
| 16. |
Coat the new O-ring with ATF, and install it
to the overflow plug.
O-ring
size: inner dia.-15.41mm,
thickness-2.21mm
| |
| 17. |
Tighten the overflow plug by using Torx(T40)
wrench with the specified torque.
Tightening
torque :
6-9 Nm(0.6-0.9 kgf.m, 4.3-6.5
lb-ft)
|
|
Be sure to wipe off spilled ATF
completely after tightening the overflow
plug. | |
Oil
Seal (Manual Valve Lever) Replacement
| 1. |
Remove the TCU. (refer to TCU's
Removal)
|
Be careful not to damage the
terminals. | |
| 2. |
Using a screwdriver, remove the oil seal
(A).
| • |
Tape the screwdriver tip before
use. |
| • |
Be careful not to damage the
transmission case. |
| • |
Be careful not to damage the
manual valve
lever. | |

|
| 3. |
Using the special tool (09459-3J000) and a
hammer, install the new oil seal to the T/A case.
Specification:
0+0.4/-0.3mm (From end of transmission
case)
|
|
Be careful not to damage the oil
seal. |

|
| 4. |
Install the TCU. (refer to TCU's
Installation) |
Oil
Seal (Oil Pump) Replacement
| 1. |
Drain the ATF by removing the overflow plug
and the filler plug. |
| 2. |
Remove the transmission (refer to Automatic
Transaxle's Removal) |
| 3. |
Take off the torque converter assembly from
the transmission. |
| 4. |
Using the special tool (09455-32200), remove
the oil seal (A) from the oil pump assembly.
|
Be careful not to damage the bushing
on the oil pump body. |

|
| 5. |
Using the special tool (09453-3J000) and a
hammer, install the new oil seal to the oil pump body.
Specification:
0±0.2 mm (From end of oil pump)
|

|
| 6. |
Using a screwdriver, position the drive gear
on the oil pump assembly in the center. Then install the torque
converter assembly on the transmission.
|
Be careful not to damage the oil
seal. | |
| 7. |
Check that the torque converter assembly is
installed properly.
Specification:
approx. 9.4 mm(From end of
transmission housing)
|

|
| 8. |
Install the transmission. (refer to
Automatic Transaxle's Installation) |
| 9. |
Refill the ATF. (refer to Procedure of Oil
level adjusting) |
Oil
Seal (Transmission Case Side) Replacement
| 1. |
Drain the ATF by removing the overflow plug
and the filler plug. |
| 2. |
Disconnect the left drive shaft assembly.
(refer to Driveshaft in DS group) |
| 3. |
Insert a screwdriver between the
differential case and the oil seal lip and pry the screwdriver to
remove the oil seal.
| • |
Tape the screwdriver tip before
use. |
| • |
Be careful not to damage the
transmission case. |
| • |
Be careful not to damage the
differential
case. | | |
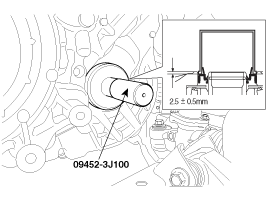
| 4. |
Using the specified tool (09452-3J100) and a
hammer, install the new oil seal to the T/A case.
Specification:
2.5±0.5 mm (From end of transmission
case)
|
|
Be careful not to damage the oil
seal. |
|
| 5. |
Connect the left drive shaft assembly.
(refer to Driveshaft in DS group) |
| 6. |
Refill the ATF. (refer to Procedure of Oil
level adjusting) |
Oil
Seal (Transmission Housing Side) Replacement
| 1. |
Drain the ATF by removing the overflow plug
and the filler plug. |
| 2. |
Disconnect the right drive shaft assembly.
(refer to Driveshaft in DS group) |
| 3. |
In case of 4WD, remove the trasfer case
assembly. (refer to Transfer case's
Removal) |
| 4. |
Insert a screwdriver between the
differential case and the oil seal lip and pry the screwdriver to
remove the oil seal.
| • |
Tape the screwdriver tip before
use. |
| • |
Be careful not to damage the
transmission housing. |
| • |
Be careful not to damage the
differential
case. | | |
| 5. |
Using the specified tool (09452-3J000[2WD]
or 09473-3J000[4WD]) and a hammer, install the new oil seal to the
trasmission housing.
Specification:
(From end of transmission housing)
18.0±0.5mm (2WD), 23.1±0.5mm
(4WD)
|
|
Be careful not to damage the oil
seal. |

|
| 6. |
In case of 4WD, install the trasfer case
assembly. (refer to Transfer case's
Installation) |
| 7. |
Connect the right drive shaft assembly.
(refer to Driveshaft in DS group) |
| 8. |
Refill the ATF. (refer to Procedure of Oil
level
adjusting) |