Roof
Rack Replacement
| •
|
When prying with a flat-tip screwdriver,
wrap it with protective tape, and apply protective tape around the
related parts, to prevent damage. |
| •
|
Put on gloves to protect your
hands. |
| •
|
Take care not to scratch the body
surface. |
| 1. |
Remove the roof rack cover
(A). |
| 2. |
Remove the roof cross bar
(B). |
| 3. |
Remove the roof rack
(C). |
| 4. |
Installation is the reverse of
removal.

1. Roof side rack
(LH)
2. Roof side rack
(RH)
3. Roof cross
bar
|
4. Roof rack cover
(FR.RH)
5. Roof rack cover
(RR.RH)
6. Roof rack cover
(RR.LH)
7. Roof rack cover
(FR.RH)
|
|
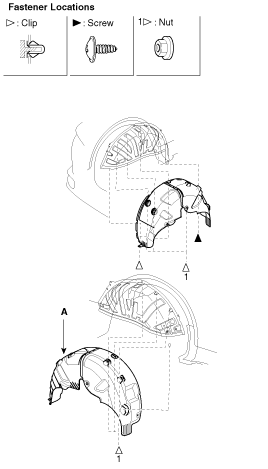
Front
Wheel Guard Replacement
| •
|
When prying with a flat-tip
screwdriver, wrap it with protective tape, and apply
protective tape around the related parts, to prevent
damage. |
| •
|
Put on gloves to protect your
hands. |
| •
|
Take care not to scratch the body
surface. | |
| 1. |
Remove the wheel guard (A).

|
| 2. |
Installation is the reverse of
removal. |
Rear
Mud Wheel Guard Replacement
| •
|
When prying with a flat-tip
screwdriver, wrap it with protective tape, and apply
protective tape around the related parts, to prevent
damage. |
| •
|
Put on gloves to protect your
hands. |
| •
|
Take care not to scratch the body
surface. | |
| 1. |
Remove the wheel guard (A).
|
| 2. |
Installation is the reverse of
removal. |
Side
Garnish And Side Sill Replacement
| •
|
When prying with a flat-tip
screwdriver, wrap it with protective tape, and apply
protective tape around the related parts, to prevent
damage. |
| •
|
Put on gloves to protect your
hands. |
| •
|
Take care not to scratch the body
surface. | |
| 1. |
Prepare to remove the garnish from inside
the vehicle.
| A. |
To remove screws the front and rear
door
panel. | |
| 2. |
Remove the clips and screws and gently pry
the side garnish or side sill away from the door while removing the
adhesive tape. |
| 3. |
Installation is the reverse of
removal.
Replace any damaged clips adhesive
tape.

1. Quactor side
garnish
2. Rear door side
garnish
3. Front door side
garnish
|
4. Side step cover
(FR)
5. Side step cover
(RR)
|
6. Side step
bracket
7. Fender side
garnish
|

1. Quactor side
garnish
2. Rear door side
garnish
3. Front door side
garnish
|
4. Side seal cover
(FR)
5. Side seal cover
(RR)
6. Fender side
garnish
|
|
Tailgate
Garnish Replacement
| 1. |
Remove the tailgate
trim. |
| 2. |
Disconnect the connector
(A). |
| 3. |
Remove the tailgate garnish
(B).

|
| 4. |
Installation is the reverse of
removal. |
Spolier
Replacement
| 1. |
Remove the following parts.
| B. |
Cap (A). stop lamp connector
(C) |
| C. |
Rear windshield washer nozzle
(B) | |
| 2. |
After loosening the mounting nuts, then
remove the spoiler (D).
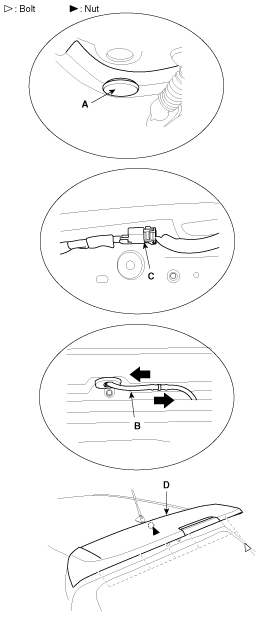
|
| 3. |
Installation is the reverse of
removal. |