Glass
Adjustment
| •
|
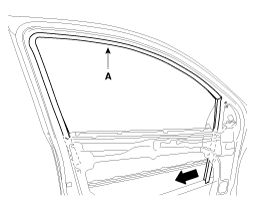
Check the glass run channel for damage
or deterioration, and replace them
necessary. | |
| 1. |
Remove the following parts.
|
| 2. |
Carefully move the glass (A) until you can
see the glass mounting bolts (B), then loosen them.

|
| 3. |
Check that the glass moves
smoothly. |
| 4. |
Raise the glass fully, and check for
gaps.
Check that the glass contacts the glass run
chann elevenly. |
| 5. |
Check for water leaks. Run water over the
roof andon the sealing area as shown, and note these
items:
| A. |
Use a 12mm (1/2Iin.) diameter hose
(A). |
| B. |
Adjust the rate of water flow as shown
(B). |
| D. |
Hold the hose about 300mm(12in.) away
from the door (C). |

|
Door
Position Adjustment
| •
|
After installing the door, check for a
flush fit with the body, then check for equal gaps between the
front,rear, and bottom, door edges and the body. check that
the door and body edges are parallel. before adjusting,
replace the mounting
bolts. | |
| 1. |
Place the vehicle on a firm, level surface
when adjusting the doors. |
| 2. |
Adjust at the hinges (A):
| A. |
Loosen the door mounting bolts
slightly, and move the door IN or OUT until it aligns flush
with the body. |
| B. |
Loosen the hinge mounting bolts
slightly, and move the door BACKWARD or FORWARD, UP or DOWN as
necessary to equalize the
gaps. |
| C. |
Place a shop towel on the jack to
prevent damage to the door when adjusting the
door. |
|
| 3. |
Check that the door and body edges are
parallel.
|
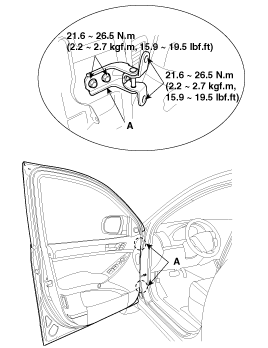
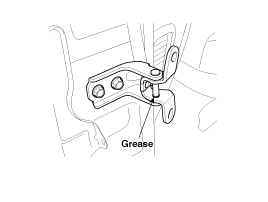
| 4. |
Grease the pivot portions of the hinges
indicated by the arrows.
|
| 5. |
Check for water
leaks. |
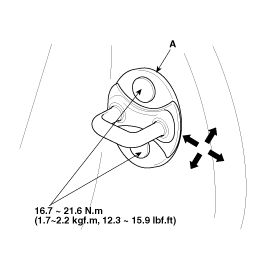
Door
Striker Adjustment
Make sure the door
latches securely without slamming it.
If necessary adjust
the striker (A): The striker nuts are fixed.
The striker can be
fine adjusted up or down, and in or out.
| 1. |
Loosen the screws, then insert a shop towel
between the body and striker.
|
| 2. |
Lightly tighten the
screws. |
| 3. |
Wrap the striker with a shop towel, then
adjust the striker by tapping it with a plastic hammer.
Do not tap the striker too
hard. |
| 4. |
Loosen the screws and remove the shop
towel. |
| 5. |
Lightly tighten the
screws. |
| 6. |
Hold the outer handle out, and push the door
against the body to be sure the striker allows a flush fit. If the
door latches properly, tighten the screws and
recheck. |
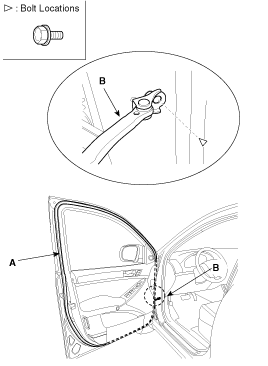
Door
Belt Weatherstrip Replacement
| 1. |
Remove the door belt weatherstrip
(A).
|
| 2. |
Installation is the reverse of
removal. |
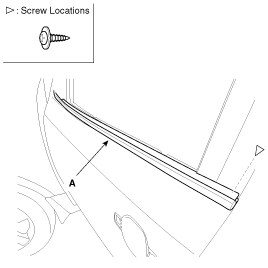
Door
Weatherstrip Replacement
| 1. |
Loosen the checker (B) mounting
bolts. |
| 2. |
Detach the clips, then remove the
weatherstrip (A).
|
| 3. |
Installation is the reverse of
removal. |
Out
Side Handle Replacement
| 2. |
After loosening the mounting bolt, then
remove the key holder (B).
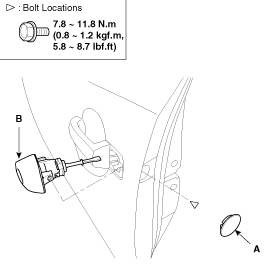
|
| 3. |
Remove the outside handle (A) by sliding it
rearward.
|
| 4. |
Installation is the reverse of
removal.
| • |
Make sure the door lock and open
properly. | | |
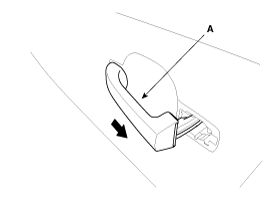
Inside
Handle Replacement
| 2. |
Remove the inside handle (A).

|
| 3. |
Installation is the reverse of
removal. |
Door
Trim Replacement
| •
|
Take care not to scratch the door trim
and other parts. |
| •
|
Put on gloves to protect your
hands. | |
| 1. |
Remove the quadrant inner cover
(A). |
| 2. |
Disconnect the connector (B).

|
| 3. |
Remove the inside cover (A).

|
| 5. |
Loosen the door trim (D) mounting screws.
Release the clips that hold the door trim, then remove the door trim
by pulling it upward. Disconnect the power window switch connector
(A), power mirror connector (B), and door courtesy lamp connector
(C).
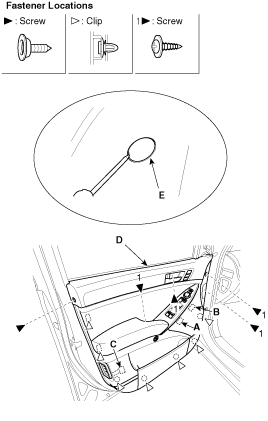
|
| 6. |
Remove the inside handle cable assembly
(A).

|
| 7. |
Installation is the reverse of
removal.
| • |
Make sure of connectors is
plugged in properly and each rod is connected
securely. |
| • |
Make sure the door lock and
opens
properly. | | |
Glass
Replacement
| 1. |
Remove the front door
trim. |
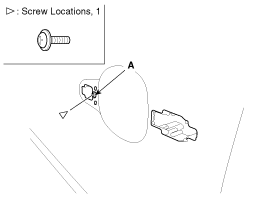
| 2. |
Remove the glass mounting hole plug
(A).
| • |
Using the door switch to align
the mounting hole with the hole on the door
glass. |
| • |
If it is impossible, align the
hole with hands after removing the
motor. |
| • |
Take care not to drop to glass
and scratch the glass
surface. | | |
| 3. |
Carefully move the glass (A) until you can
see the bolts, then loosen them. Separate the glass from the glass
run and carefully pull the glass out through the window
slot.

|
| 4. |
Installation is the reverse of
removal.
| • |
Roll the glass up down to see if
it move freely without
binding. |
| • |
Adjust the position of the glass
as
necessary. | | |
Glass
Run Channel Replacement
| 1. |
Remove the following parts.
|
| 2. |
Remove the run channel (A).
|
| 3. |
Installation is the reverse of
removal. |
Speaker
Replacement
| 2. |
Drill out the rivets to remove the speaker
(B) from the door module. |
| 3. |
Disconnect the speaker connector
(A).

|
| 4. |
Installation is the reverse of
removal.
Use sheet metal screws to secure the
speaker. |
Power
Window Motor Replacement
| 2. |
After disconnecting the connector (A),
remove the power window motor (B).

|
| 3. |
Installation is the reverse of
removal.
| • |
The area of rotational parts and
springs should be applied with sufficient
grease. |
| • |
Roll the glass up down to see if
it move freely without
binding. | | |
Door
Module Assembly Replacement
| 1. |
Remove the following parts.
|
| 2. |
Loosen the mounting screw (A).
|
| 3. |
Loosen the door module mounting bolts, then
remove the door module (A).

|
| 4. |
Disconnect the connector
(A). |
| 5. |
Disconnect the door module wiring harness
(B), then remove the module assembly.

|
| 6. |
Installation is the reverse of
removal.
| • |
The area of whole parts should
be applied with sufficient
grease. |
| • |
Make sure the connector is
plugged in properly and each rod is connected
securely. |
| • |
Make sure the door lock and open
properly. | | |
Door
Checker Replacement
| 1. |
Remove the following parts.
|
| 2. |
After loosening the mounting bolts and nuts,
then remove the door checker (A).

|
| 3. |
Installation is the reverse of
removal.
| • |
Make sure the door opens
properly and locks
securely. | | |
Door
Panel Replacement
| 1. |
Remove the following parts.
|
| 2. |
After loosening the mounting bolts, then
remove the door panel (A).

|
| 3. |
Installation is the reverse of
removal.
| • |
Replace any damaged
clips. |
| • |
Make sure the door opens
properly and locks
securely. |
| • |
Adjust the door
alignment. |
| • |
Adjust the glass
alignment. | | |