
The CVVT (Continuously
Variable Valve Timing) system is installed to the chain sprocket of the
intake camshaft. This system controls the intake camshaft to provide the
optimal valve timing. The PCM controls the Oil Control Valve(OCV), based
on the signals output from mass air flow, throttle position and engine
coolant temperature. The CVVT controller regulates the intake camshaft
angle using oil pressure through the OCV. As result, the relative position
between the camshaft and the crankshaft becomes optimal, and the engine
torque improves, fuel economy improves, exhaust emissions decrease under
overall driving conditions.
PCM monitors OCV stuck
while cam signal is normally generating and Valve cleaning is not in
progress. If the CAM Acutal Position is too high or low and Difference
between Cam Actual Position and Desired Position is higher than 20° PCM
determines that a fault exists and a DTC is stored.
Item
|
Detecting
Condition
|
Possible cause
|
DTC Strategy
|
| •
|
Determines if oil control valve is
stuck | |
|
Enable Conditions
|
| •
|
Valve cleaning not in
progress |
| •
|
CAM signal is normally
generating | |
Thresh
old value
|
Case
1
|
| •
|
Cam Actual Position > 50 CAD or
Difference between CAM Actual Position and Desired Position
> 20 CAD | |
Case
2
|
| •
|
Cam Actual Position < 5 CAD or
Difference between CAM Actual Position and Desired Position
> 20 CAD | |
Diagnosis Time
|
| •
|
Continuous (Within
1min.) | |
MIL On Condition
|
|


Fig.1. Idle - normal
Condition
Fig.
2.Acceleration
| 1. |
Check DTC Status
| (1) |
Connect scantool to Data Link
Connector(DLC). |
| (3) |
Select "DTC" button, and then Press "DTC
Status" to check DTC'sinformation from the DTCs
menu. |
| (4) |
Read "DTC Status"
parameter.
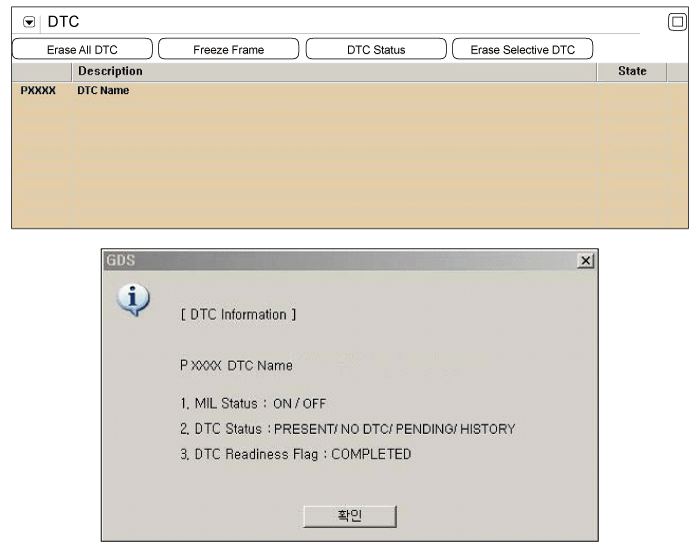
|
| (5) |
Is parameter displayed "Present
fault"?
|

|
▶ Go
to "Terminal and Connector inspection"
procedure.
|
|

|
▶
Fault is intermittent caused by PCM memory was not
cleared after repair. Erase DTC and drive the vehicle to
satisfy the enable condition then, go to " System
Inspection"
procedure.
|
| |
| Terminal And Connector
Inspection |
| 1. |
Many malfunctions in the electrical system are
caused by poor harness and terminal condition. Faults can also be
caused by interference from other electrical systems, and mechanical
or chemical damage. |
| 2. |
Thoroughly check connectors for looseness,
poor connection, bending, corrosion, contamination, deterioration,
or damage. |
| 3. |
Has a problem been found?
|
|
▶ Repair as
necessary and go to "Verification of Vehicle Repair"
procedure
|
|
|
▶ Go to "
Power Circuit Inspection " as
follow
|
|
■ Check Voltage
| 1. |
IG "OFF" and disconnect OCV
connector. |
| 3. |
Measure voltage between power terminal of OCV
harness connector and chassis ground.
|
Be careful not to change the connectors
for Bank1 and Bank2 |
|
| 4. |
Is the measured voltage within specification
?
|
|
▶ Go to "
Control Circuit Inspection " procedure.
|
|
|
▶ Check
that Fuse between Main Relay and OCV is open.
▶ Check open between main relay and
OCV.
▶ Check short to ground
between Main Relay and OCV.
▶
Repair or replace as necessay go to "Verification of Vehicle
Repair "
procedure.
|
|
| Control Circuit
Inspection |
■ Check Voltage
| 1. |
IG "OFF" and disconnect OCV
connector. |
| 3. |
Measure voltage between control terminal of
OCV harness connector and chassis ground.
Specification
: Approx. below 1V
| |
| 4. |
Is the measured voltage within specification
?
|
|
▶ Go to
"System Inspection" procedure.
|
|
|
▶ Repair or
replace as necessary and then go to "Verification of Vehicle
Repair"
procedure.
|
|
■ Visual Inspection
| 1. |
Check oil level is
O.K. |
| 2. |
Check oil is
contaminated. |
| 3. |
Check that any oil leakage is occurred around
CVVT system. |
| 4. |
Has a problem been found ?
|
|
▶ Repair or
replace as necessary and then, go to " Verification of Vehicle
Repair" procedure.
|
|
|
▶ Go to
"Component Inspection"
procedure.
|
|
■ Check OCV Resistance
| 1. |
IG "OFF" and disconnect OCV
connector. |
| 2. |
Measure resistance between power and signal
terminals of OCV. (Component Side)
Specification
: 6.7 ~ 7.7 Ω
| |
| 3. |
Is the measured resistance within
specification?
|
|
▶ Go to
"Check CAM PHASER with actuation test" as
follows.
|
|
|
▶
Substitute with a known - good OCV and check for proper
operation. If the problem is corrected, replace OCV and go to
"Verification of Vehicle Repair"
procedure.
|
|
■ Check Cam Phaser With Actuation Test
| 1. |
Connect scantool and IG
"ON". |
| 2. |
Select "CAM PHASER INTAKE BANK 1" on the
Actuation Test. |
| 3. |
Select "OIL CONTROL VALVE" on the Actuation
Test. |
| 4. |
Activates "CAM PHASER INTAKE BANK 1" by
pressing "STRT(F1)" key. |
| 5. |
Activates "OIL CONTROL VALVE" by pressing
"STRT(F1)" key. |
| 6. |
Repeat this procedure 4 or 5 times to ensure
CAM PHASER and intake valve control solenoid
reliability.

|
| 7. |
Has a problem been found ?
|
|
▶
Substitute with a known - good CVVT or OCV and check for
proper operation.
If the problem is
corrected, replace CVVT or OCV and go to "Verification of
Vehicle Repair" procedure.
|
|
|
▶ Fault is
intermittent. Drive the vehicle to meet the enable condition
for the DTC. and Go to "Verification of Vehicle Repair"
procedure
|
|
| Verification Of Vehicle
Repair |
After a repair, it is
essential to verify that the fault has been corrected.
| 1. |
Connect scantool and select "DTC"
button. |
| 2. |
Press "DTC Status" button and confirm that
"DTC Readiness Flag" indicates "Completed". If not, drive the
vehicle within conditions noted in the freeze frame data or enable
conditions |
| 3. |
Read "DTC Status"
parameter. |
| 4. |
Is parameter displayed "History(Not Present)
fault"?
|
|
▶ System
performing to specification at this time. Clear the
DTC
|
|
|
▶ Go to the
applicable troubleshooting
procedure.
|
|