The evaporative emission
control system prevents hydrocarbon (HC) vapors from the fuel tank from
escaping into the atmosphere where they could form photochemical smog.
Gasoline vapors are collected in the charcoal canister. The PCM controls
the Purge Control Solenoid Valve (PCSV) to purge any collected vapors from
the canister back to the engine for combustion. This valve is actuated by
the purge control signal from the PCM and controls fuel vapor flow from
the canister to the intake manifold.
Checking output signals
from fuel tank pressure sensor under evap.system test, if fuel tank's
vacuum decay slope is higher than prescribed threshold, PCM sets P0442 and
then MIL(Malfunction Indication Lamp) turns on.
Item
|
Detecting
Condition
|
Possible cause
|
DTC
Strategy
|
| •
|
Monitor the vacuum decay
slope | |
| •
|
Leakage in each hose/fuel filler
pipe |
| •
|
Leakage in CCV/ Canister/ Fuel tank
/Fuel Filler Cap | |
EnableConditions
|
| •
|
10 V < Battery voltage < 16
V |
| •
|
Barometric pressure > 72 kPa (0.72
bar) |
| •
|
Engine coolant temperature at startup -
Intake air temperature at startup < 6.7°C(12
°F) |
| •
|
Engine coolant temperature at startup:
4.5 ~ 35°C(40 ~ 95 °F) |
| •
|
Intake air temperature at startup: 4.5 ~
35°C(40 ~ 95 °F) |
|
Threshold
value
|
| •
|
Fuel tank's vacuum > a prescribed
threshold | |
DiagnosisTime
|
| •
|
One time during Evaporative system
diagnosis | |
MIL On
Condition
|
|
| 1. |
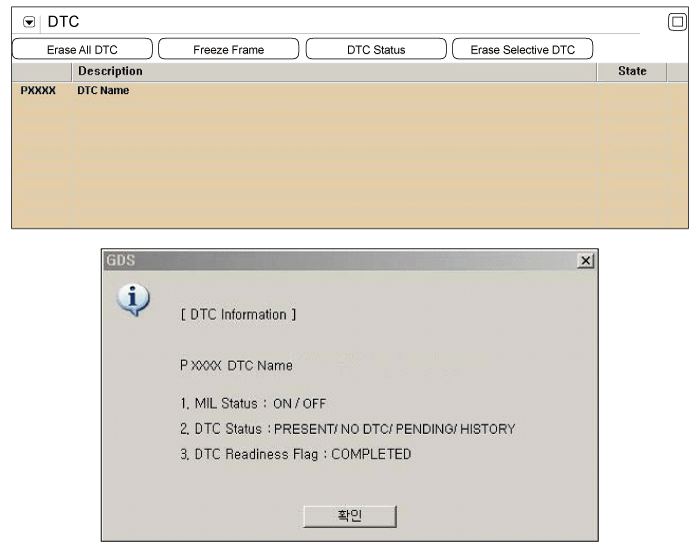
Check DTC Status
| (1) |
Connect scantool to Data Link
Connector(DLC). |
| (3) |
Select "DTC" button, and then Press "DTC
Status" to check DTC's information from the DTCs
menu. |
| (4) |
Read "DTC Status"
parameter.
|
| (5) |
Is parameter displayed "Present
fault"?
|

|
▶ Go
to "System Inspection" procedure.
|
|

|
▶ Go
to "Evap.Leakage Test" as below with scan
tool.
|
| |
| 2. |
Evap. Leakage Test
| (1) |
Cool the vehicle down for about two
hours to prevent
misdiagnosis. |
| (2) |
Install scan tool and IG "ON" and then
clear DTC. |
| (3) |
Select and press "EVAP.LEAKAGE TEST"
mode in the scan tool. |
| (4) |
Check if the vehicle is under test
conditions as below [Fig 1]. |
| (5) |
If OK, Start engine and restart
Evap.Leakage Test again[Fig 2].


|
| (6) |
Is the same DTC set after the
Evap.leakage test with scan tool ?
|
|
▶ Go
to "System Inspection" procedure.
|
|
|
▶
Repeat "Evap.leakage test" with scan tool after cool the
vehicle down sufficiently. If the same DTC isn't
displayed after the test, it was intermittent fault. Go
to "Verification of vehicle Repair"
procedure.
|
| |
| 1. |
Check Fuel Filler Cap
| (1) |
Check the Fuel Filler Cap is installed
and properly tightened. |
| (2) |
Check if the Fuel Filler Cap seal is
missing or damaged. |
| (3) |
Is the Fuel Filler Cap OK?
|
|
▶ Go
to "Check vapor hoses for leakage in fuel system" as
below
|
|
|
▶
Replace the Fuel Filler Cap and go to "Verification of
Vehicle Repair"
procedure.
|
| |
| 2. |
Check vapor hoses for leakage in fuel
system
| (1) |
Check vapor hoses between the following
components for leakage:
| A. |
Intake manifoled ~ Purge control
solenoid valve (PCSV) |
| B. |
Purge control solenoid valve
(PCSV) ~ Canister |
| C. |
Canister ~ Canister close valve
(CCV) |
|
| (2) |
Does a leak exist?
|
|
▶
Repair or replace as necessary and then, go to
"Verification of Vehicle Repair"
procedure.
|
|
|
▶ Go
to "Check fuel filler pipe for crack or leakage" as
below
|
| |
| 3. |
Check fuel filler pipe for crack or
leakage
| (1) |
Check that there is crack or leakage in
fuel filler pipe |
| (2) |
Is there any crack or leakage
?
|
|
▶
Repair or replace as necessary and then, go to
"Verification of Vehicle Repair"
procedure.
|
|
|
▶ Go
to "Component inspection"
procedure.
|
| |
| 1. |
Check CCV for leakage
| (1) |
Disconnect the hose leading from the CCV
to Canister at CCV. |
| (2) |
Visually Check any tear of the hose
leading from the CCV to
Canister |
| (3) |
When the CCV operates, apply a vacuum at
the nipple and verify that the CCV holds
vacuum. |
| (4) |
Does a leak exist?
|
|
▶
Repair or replace as necessary and then go to
"Verification of Vehicle Repair"
procedure.
|
|
|
▶ Go
to "Check Canister for leakage" as
below
|
| |
| 2. |
Check Canister for leakage
| (1) |
Disconnect the hose leading from the CCV
to Canister at Canister. |
| (2) |
When the other nipples are plugged,
apply a vacuum at the vent nipple and verify that the Canister
holds vacuum. |
| (3) |
Does a leak exist?
|
|
▶
Repair or replace as necessary and then go to
"Verification of Vehicle Repair"
procedure.
|
|
|
▶ Go
to "Check fuel tank for leakage" as
below
|
| |
| 3. |
Check fuel tank for leakage
| (1) |
Check fuel tank for crack or
leakage. |
| (2) |
Does a leak exist?
|
|
▶
Repair or replace as necessary and then go to
"Verification of Vehicle Repair"
procedure.
|
|
|
▶
Carefully perform this troubleshooting procedures all
over again from the
beginning.
|
| |
| Verification Of Vehicle
Repair |
After a repair, it is
essential to verify that the fault has been corrected.
| 1. |
Connect scantool and select "DTC"
button. |
| 2. |
Press "DTC Status" button and confirm that
"DTC Readiness Flag" indicates "Completed". If not, drive the
vehicle within conditions noted in the freeze frame data or enable
conditions |
| 3. |
Read "DTC Status"
parameter |
| 4. |
Is parameter displayed "History(Not Present)
fault"?
|
|
▶ System
performing to specification at this time. Clear the
DTC
|
|
|
▶ Go to the
applicable troubleshooting
procedure.
|
|