| Engine Coolant Refilling And
Bleeding |
|
Never remove the radiator cap when the
engine is hot. Serious scalding could be caused by hot fluid under
high pressure escaping from the
radiator. |
|
When pouring engine coolant, be sure to shut
the relay box lid and not to let coolant spill on the electrical
parts or the paint. If any coolant spills, rinse it off
immediately. |
| 1. |
Make sure the engine and radiator are cool
to the touch. |
| 2. |
Remove the radiator
cap. |
| 3. |
Loosen the drain plug, and drain the
coolant. |
| 4. |
Tighten the radiator drain plug
securely. |
| 5. |
Remove, drain and reinstall the reservoir.
Fill the tank halfway to the MAX mark with water, then up to the MAX
mark with antifreeze. |
| 6. |
Fill fluid mixture with coolant and water(4
: 6) slowly through the radiator cap. Push the upper/lower hoses of
the radiator so as to bleed air easily.
| • |
Use only genuine
antifreeze/coolant. |
| • |
For best corrosion protection,
the coolant concentration must be maintained year-round
at 50% minimum.
Coolant concentrations less than
50% may not provide sufficient protection against
corrosion or freezing. |
| • |
Coolant concentrations greater
than 60% will impair cooling efficiency and are not
recommended. | |
| • |
Do not mix different brands of
antifreeze/coolants. |
| • |
Do not use additional rust
inhibitors or antirust products; they may not be
compatible with the
coolant. | | |
| 7. |
Start the engine and run so coolant
circulates.
When the cooling fan operates and coolant
circulates, refill coolant through the radiator
cap. |
| 8. |
Repeat 7 until the cooling fan cycles 3 ~ 5
times and bleed air sufficiently out of the cooling
system. |
| 9. |
Install the radiator cap and fill the
reservoir tank to the "MAX" line with
coolant. |
| 10. |
Run the vehicle under idle until the cooling
fan operates 2 ~ 3 times. |
| 11. |
Stop the engine and wait until coolant gets
cool. |
| 12. |
Repeat 6 to 11 until the coolant level
doesn't fall any more, bleed air out of the cooling
system.
|
Bleed air out of the cooling system
and refill coolant when coolant completely cools, recheck the
coolant level in the reservoir tank for 2 ~ 3 days after
replacing
coolant. | |
| 1. |
Drain the engine coolant.
|
System is under high pressure when the
engine is hot. To avoid danger of releasing scalding engine
coolant, remove the cap only when the engine is
cool. | |
| 2. |
Remove the drive belt(A).
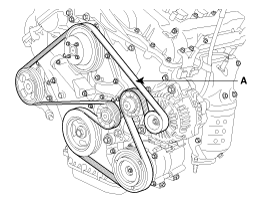
|
| 3. |
Remove the 4 bolts and the pump
pulley(A).

|
| 4. |
Remove the water pump(A) and
gasket.

|
Water
Temperature Control Assembly
| 1. |
Drain the engine
coolant. |
| 2. |
Remove the air cleaner
assembly. |
| 3. |
Disconnect the radiator upper and lower
hose(A).

|
| 4. |
Disconnect the ECT sensor
connector. |
| 5. |
Disconnect the heater hose, the water vent
hose and the water hose from water temperature control
assembly. |
| 6. |
Remove the wiring
protector. |
| 7. |
Remove the water temperature control
assembly(A).

|
Thermostat
|
Removal of the thermostat would have an
adverse effect, causing a lowering of cooling efficiency. Do not
remove the thermostat, even if the engine tends to
overheat. |
| 1. |
Drain engine coolant so its level is below
thermostat. |
| 2. |
Remove the water inlet(A) and the
thermostat(B).
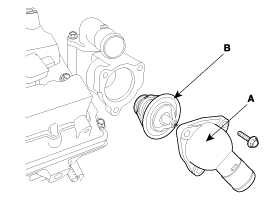
|
Radiator
| 1. |
Drain the engine
coolant. |
| 2. |
Remove the air duct(A).

|
| 3. |
Disconnect the radiator upper and lower
hoses(A).
|
| 4. |
Disconnect transaxle oil cooler
hoses. |
| 5. |
Disconnect the radiator fan
connector. |
| 6. |
Remove the radiator
bracket. |
Water
Pump
| 1. |
Check each part for cracks, damage or wear,
and replace the coolant pump assembly if
necessary. |
| 2. |
Check the bearing for damage, abnormal noise
and sluggish rotation, and replace the coolant pump assembly if
necessary. |
| 3. |
Check for coolant leakage. If coolant leaks
from hole, the seal is defective. Replace the coolant pump
assembly.
|
A small amount of "weeping" from the
bleed hole is
normal. | |
Thermostat
| 1. |
Immerse the thermostat in water and
gradually heat the water.

|
| 2. |
Check the valve opening
temperature.
Valve
opening temperature : 82°C
(177°F)
Full
opening temperature : 95°C
(205°F)
|
If the valve opening temperature is not as
specified, replace the thermostat. |
| 3. |
Check the valve lift.
Valve lift
: Min. 10mm (0.4in.) at 95°C
(205°F)
|
If the valve lift is not as specified,
replace the thermostat. |
Cap
Testing
| 1. |
Remove the radiator cap, wet its seal with
engine coolant, then install it to pressure tester.
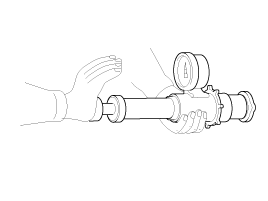
|
| 2. |
Apply a pressure of 93 ~ 123kPa (0.95 ~
1.25kgf/cm², 14 ~ 19psi) |
| 3. |
Check for a drop in
pressure. |
| 4. |
If the pressure drops, replace the
cap. |
Testing
| 1. |
Wait until engine is cool, then carefully
remove the radiator cap and fill the radiator with engine coolant,
then install it on the pressure tester.

|
| 2. |
Apply a pressure tester to the radiator and
apply a pressure of 93 ~ 123kPa (0.95 ~ 1.25kgf/cm² 14
~18psi). |
| 3. |
Inspect for engine coolant leaks and a drop
in pressure. |
| 4. |
Remove the tester and reinstall the radiator
cap.
|
Check for engine oil in the coolant
and/or coolant in the engine
oil. | |
| 1. |
Install the water pump(A) and a new
gasket(B) with 12 bolts.
Tightening
torque
21.56 ~ 23.52Nm (2.2 ~ 2.4kgf.m, 15.91
~ 17.36lb-ft)
9.80 ~ 11.76Nm (1.0 ~ 1.2kgf.m, 7.23 ~
8.68lb-ft)
|

| • |
Clean the contact face before
assembly. |
| • |
Always use a new bolt(C) and
gaskets(B). | | |
| 2. |
Install the 4 bolts and the pump
pulley(A).
Tightening
torque
7.84 ~ 9.80Nm (0.8 ~ 1.0kgf.m, 5.78 ~
7.23lb-ft)
|
|
| 3. |
Install the drive belt(A).

|
| 4. |
Fill with engine
coolant. |
| 5. |
Start engine and check for
leaks. |
| 6. |
Recheck engine coolant
level. |
Water
Temperature Control Assembly
|
Clean the contact face before
assembly. |
| 1. |
Install the water temperature control
assembly(B) and a new gasket(A).
Tightening
torque
18.62 ~ 23.52Nm (1.9 ~ 2.4kgf.m, 13.74
~ 17.36lb-ft)
|

|
Use new O-rings(C) when
reassembling. | |
| 2. |
Connect water hoses to the water temperature
control assembly. |
| 3. |
Install the wiring
protector. |
| 4. |
Connect the ECT sensor
connector. |
| 5. |
Connect the radiator upper and lower
hose(A).
|
| 6. |
Install the air cleaner
assembly. |
| 7. |
Fill with engine
coolant. |
| 8. |
Start engine and check for
leaks. |
| 9. |
Recheck engine coolant
level. |
Thermostat
| 1. |
Place the thermostat in thermostat
housing.
| (1) |
Install the thermostat with the jiggle
valve upward. |
| (2) |
Install a new
thermostat(B).
| |
| 2. |
Install the water inlet(A).
Tightening
torque
16.66 ~ 19.60Nm (1.7 ~ 2.0kgf.m, 12.30
~ 14.47lb-ft)
| |
| 3. |
Fill with engine
coolant. |
| 4. |
Start engine and check for
leaks. |
Radiator
| 2. |
Install the radiator
bracket. |
| 3. |
Reconnect the radiator fan
connector. |
| 4. |
Connect the transaxle oil cooler
hoses. |
| 5. |
Connect the radiator upper and lower
hoses(A).
|
| 6. |
Install the air duct(A).
|
| 7. |
Fill with engine
coolant. |
| 8. |
Start engine and check for
leaks. |
| 9. |
Recheck engine coolant
level. | |